
How To Fix the HTTPS “Not Secure” Message Appearing For Your Website
If you’ve ever visited a website and noticed a “Not Secure” warning in your browser’s address bar, you’re not alone—and neither are your visitors. This warning can be alarming to users and damaging to your business. In this guide, we’ll break down why this happens, how to fix it, and why securing your site is vital for SEO, credibility, and conversions.
At Conversion Pipeline, we help businesses build trust online. If you need professional assistance implementing HTTPS correctly, our team is here to help.
What Does the “Not Secure” Warning Mean?
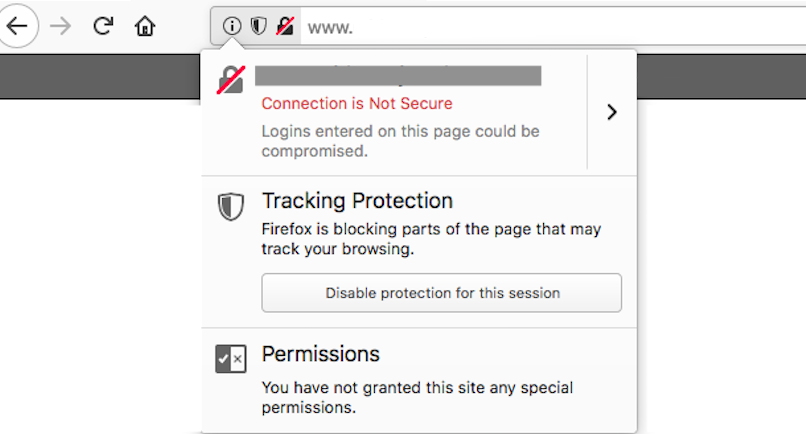
When you see a “Not Secure” warning in browsers like Google Chrome, Firefox, or Safari, it means that the website you’re visiting is not using HTTPS (Hypertext Transfer Protocol Secure). Instead, it’s using HTTP, which does not encrypt the data exchanged between your browser and the server.
Why Does This Matter?
Without HTTPS:
- Your website is vulnerable to man-in-the-middle attacks.
- User information (like contact forms or payment details) can be intercepted.
- Browsers may block your site or display scary warnings to potential visitors.
This creates a trust issue—and in the digital world, trust is everything.
The SEO Impact of HTTPS
In 2014, Google announced that HTTPS would become a ranking signal. That means secure websites are more likely to rank higher in search results.
Here’s why HTTPS is good for SEO:
- Improved user trust: Visitors are more likely to stay on your site if it’s secure.
- Increased conversions: A secure environment reassures users during transactions or form submissions.
- Better performance: Many HTTPS implementations support HTTP/2, which is faster than HTTP.
Why You’re Seeing the “Not Secure” Warning
Your website may display the “Not Secure” message for a few key reasons:
- You don’t have an SSL certificate installed.
- Your SSL certificate has expired.
- Mixed content issues (loading unsecured HTTP elements on an HTTPS page).
- Incorrect redirects or server configurations.
How To Fix the HTTPS “Not Secure” Warning
1. Purchase and Install an SSL Certificate
The first and most essential step is installing an SSL certificate.
There are three main types:
- DV (Domain Validation) – Basic level, good for blogs or personal sites.
- OV (Organization Validation) – Shows the organization name, better for business sites.
- EV (Extended Validation) – Highest level of trust, displays company name in green bar in some browsers.
💡 Tip: You can get free SSL certificates from Let’s Encrypt, or purchase premium ones from providers like GoDaddy, DigiCert, or Namecheap.
2. Force HTTPS Across Your Website
Once installed, configure your website to redirect all HTTP traffic to HTTPS.
- In Apache, you can do this via
.htaccess:
RewriteEngine On
RewriteCond %{HTTPS} off
RewriteRule ^(.*)$ https://%{HTTP_HOST}%{REQUEST_URI} [L,R=301]
- In NGINX:
server {
    listen 80;
    server_name yourdomain.com www.yourdomain.com;
    return 301 https://yourdomain.com$request_uri;
}
Many web hosts also offer “Force HTTPS” options via their control panels (like cPanel or Plesk).
3. Fix Mixed Content Warnings
Even with HTTPS enabled, your site might still load resources (like images, scripts, stylesheets) over HTTP, which triggers a mixed content warning.
How to fix it:
- Use browser developer tools (F12 → Console) to identify mixed content.
- Update image and asset URLs to use HTTPS.
- Consider using a plugin (like “Better Search Replace” on WordPress) to batch update URLs.
4. Update Your Sitemap and Robots.txt
Make sure your sitemap points to the HTTPS version of all URLs and submit it to Google Search Console again.
Update your robots.txt file if it references HTTP URLs.
5. Check and Update Your CMS Settings
If you’re using WordPress:
- Go to Settings > General
- Update WordPress Address (URL) and Site Address (URL) to use
https://
Other CMS platforms like Joomla, Drupal, or Shopify also have settings to ensure HTTPS is correctly configured.
6. Update Google Search Console and Google Analytics
In Google Search Console:
- Add a new property with the HTTPS version of your website.
- Submit your updated sitemap.
In Google Analytics:
- Go to Admin > Property Settings
- Change the default URL to
https://
Common HTTPS Mistakes To Avoid
- Letting SSL certificates expire – Set reminders to renew in advance.
- Only securing the homepage – Every page should load via HTTPS.
- Using outdated plugins or CMS versions – These may not support SSL fully.
- Incorrect canonical URLs – Make sure they point to the HTTPS version to avoid duplicate content issues.
Why HTTPS Is More Than a Checkbox
Switching to HTTPS isn’t just a technical task—it’s a strategic move that impacts your:
- Search visibility
- User trust
- Website performance
- Brand reputation
A secure website is a modern necessity, not an option.
Need Help Securing Your Site?
If all this sounds overwhelming, don’t worry—you don’t have to tackle it alone.
At Conversion Pipeline, we specialize in website optimization and technical SEO, including full HTTPS migration and SSL setup. We’ll:
- Install and configure your SSL certificate.
- Resolve mixed content and redirect issues.
- Ensure Google sees and ranks your secure site.
👉 Contact us today for a free consultation.
Final Thoughts
Seeing a “Not Secure” warning on your website is more than just a visual issue—it affects trust, rankings, and your bottom line. Implementing HTTPS is a critical step toward building a more professional, secure, and SEO-friendly web presence.
Take the time to do it right—or partner with experts like Conversion Pipeline to ensure a smooth transition and long-term success.